Disks: How is a defective hard disk replaced?
Briefly, the procedure looks something like this:
- Remove defective hard disk from RAID
- Replace with hard disk from Nine
- Prepare new hard disk for RAID
- Add hard disk to RAID
- Write bootloader to disk
Instructions
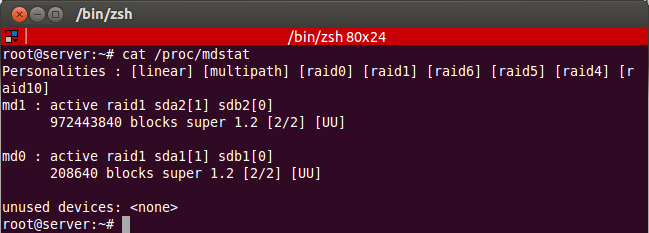
These instructions refer to dedicated servers equipped with at least two hard disks and software RAID 1 (with Nine preinstalled Ubuntu/Debian). To see whether your system uses a software RAID, check with cat /proc/mdstat. If you see more than just unused devices: , your system is equipped with a software RAID.
Check for software RAID:
root@server:~# cat /proc/mdstat
Personalities : [linear] [multipath] [raid0] [raid1] [raid6] [raid5] [raid4] [raid10]
md1 : active raid1 sda2[1] sdb2[0]
      972443840 blocks super 1.2 [2/2] [UU]

md0 : active raid1 sda1[1] sdb1[0]
      208640 blocks super 1.2 [2/2] [UU]

unused devices:

This picture shows the output from cat /proc/mdstat in a functioning, healthy RAID.
Partitions identified as failed are labelled with (F).

Defect partition in RAID
1. Removing a hard disk from RAID
A RAID partition is flagged as failed with the command mdadm --manage /dev/mdX -f /dev/sdY. X stands for the specific RAID device; Y stands for the specific true partition. When this has been done for all partitions on the hard disk, you can remove it from RAID (with the same numbers for each partition) using the command mdadm --manage /dev/mdX -r /dev/sdY.
For example, to remove the hard disk /dev/sdb from RAID, use the following commands:
root@server:~# mdadm --manage /dev/md1 -f /dev/sdb2
mdadm: set /dev/sdb2 faulty in /dev/md1

root@server:~# mdadm --manage /dev/md1 -r /dev/sdb2
mdadm: hot removed /dev/sdb2 from /dev/md1

root@server:~# mdadm --manage /dev/md0 -f /dev/sdb1
mdadm: set /dev/sdb1 faulty in /dev/md0

root@server:~# mdadm --manage /dev/md0 -r /dev/sdb1
mdadm: hot removed /dev/sdb1 from /dev/md0
2. Switching hard disk
Send a request to our support address . For security purposes, we need the IP address of your server and the serial number of the functioning hard disk.
Show the serial number of the functioning hard disk, e.g. /dev/sda:
root@server:~# hdparm -I /dev/sda | grep -i serial
Model=WDC WD1003FBYX-01Y7B1, FwRev=01.01V02, SerialNo=WD-WCAW35284076
3. Preparing hard disk for RAID
The new hard disk must now be integrated into RAID. It may have a different hard disk letter than the one being replaced. You can find the hard disk "numbering" under the partition information in /proc/partitions by comparing the disk letters with the existing RAID partitions. For example, /dev/sdc was identified as the new hard disk and this now needs to be added to RAID:
root@server:~# cat /proc/partitions
major minor  #blocks  name

   8        0  976762584 sda
   8        1     208813 sda1
   8        2  972575100 sda2
   9        0     208640 md0
   9        1  972443840 md1
252        0   10485760 dm-0
252        1    8388608 dm-1
252        2  485490688 dm-2
252        3  104857600 dm-3
252        4   10485760 dm-4
   8       16  976762584 sdc
First, you must apply the partitioning of an existing hard disk to the new hard disk. You can do this for hard disks with MBR partition tables by entering the command sfdisk. The sfdisk command combined with the following command copies the partition table from /dev/sda to /dev/sdc:
root@server:~# sfdisk -d /dev/sda | sfdisk /dev/sdc

Disk /dev/sdc: 121601 cylinders, 255 heads, 63 sectors/track
Old situation:
Units = cylinders of 8225280 bytes, blocks of 1024 bytes, counting from 0

   Device Boot Start     End   #cyls    #blocks   Id  System
/dev/sdc1          0       -       0          0    0  Empty
/dev/sdc2          0       -       0          0    0  Empty
/dev/sdc3          0       -       0          0    0  Empty
/dev/sdc4          0       -       0          0    0  Empty
New situation:
Units = sectors of 512 bytes, counting from 0

   Device Boot    Start       End   #sectors  Id  System
/dev/sdc1   *        63    417689     417627  fd  Linux raid autodetect
/dev/sdc2        417690 1945567889 1945150200  fd  Linux raid autodetect
/dev/sdc3             0         -          0   0  Empty
/dev/sdc4             0         -          0   0  Empty
Successfully wrote the new partition table

Re-reading the partition table ...
Using a GPT partition table, you can perform the copy operation as follows: sgdisk -R=/dev/sdc /dev/sda (note the order!). With GPT, a random value must be entered for the ‘GUID’ so that the hard disk (in the same server) can be used: sgdisk -G /dev/sdc.
You now have two identically partitioned hard disks and can add the new hard disk to the existing RAID.

4. Adding the hard disk to RAID
The output from cat /proc/mdstat in turn provides a reference for determining the correct partition for the correct RAID device. In this example, the partition /dev/sdc1 would be added to the RAID device /dev/md0, and /dev/sdc2 to /dev/md1:
root@server:~# mdadm --manage /dev/md0 -a /dev/sdc1
mdadm: added /dev/sdc1
root@server:~# mdadm --manage /dev/md1 -a /dev/sdc2
mdadm: added /dev/sdc2
The RAID will now start synchronising data to the new hard disk. Depending on the hard disk size and server load, this can take some time.
root@server:~# cat /proc/mdstat
Personalities : [linear] [multipath] [raid0] [raid1] [raid6] [raid5] [raid4] [raid10]
md1 : active raid1 sdc2[2] sda2[1]
      972443840 blocks super 1.2 [2/1] [_U]
      [>....................]  recovery =  0.0% (659456/972443840) finish=860.5min speed=18819K/sec

md0 : active raid1 sdc1[2] sda1[1]
      208640 blocks super 1.2 [2/1] [_U]
       resync=DELAYED

unused devices:
5. Installing the bootloader
The last step is to install the bootloader on the new hard disk so that the server will boot correctly the next time it is restarted. To do this, enter the following command:
root@server:~# grub-install /dev/sdc
Installation finished. No error reported.
Tips
Increasing the speed
The speed of the recovery is limited, in order for the server to continue with active operations. To speed up the recovery, you can manually increase the limit.
Determining the current limit:
root@server:~# sysctl dev.raid.speed_limit_min
dev.raid.speed_limit_min = 40000
To set a new limit:
root@server:~# sysctl -w dev.raid.speed_limit_min=400000
dev.raid.speed_limit_min = 400000
Hard disk not recognised
In some cases, the hard disk is not recognised. Rescanning the SCSI adapter will resolve this. To do this, enter the following command (numbering of the ‘host’ may vary; e.g. 0, 1, 2, 3, etc.):
root@server:~# echo "- - -" > /sys/class/scsi_host/host0/scan